Showing posts with label batiks. Show all posts

Friday, December 26, 2025

Mrs. Smith's Favorite


Back in April, my daughter and I traveled to Hamilton Missouri to shop at Missouri Star Quilt Company's many shops. Honestly, I just wanted to experience this quilt town since I follow them on Youtube. My daughter saw the Mrs. Smith's Favorite quilt hanging on wall at one of the shops and fell in love with it. 


She loved it so much that she asked if I could make her one almost with the same fabrics and in a queen size for her bed. 


After purchasing the Block magazine with the pattern and directions, we headed over to their Batik shop.


Omg! That shop is worth the travels to Hamilton! There are so many beautiful batiks! My daughter loved the look of the blue quilt; so, we stuck to picking from the many beautiful blue batiks. We got lucky that they had the cute small flower fabric, which was used in the quilt at the other shop.


The pattern is easy to follow, but since I didn't purchase the suggestion of layer cakes, 10" squares, I had to make changes to directions. Since my quilt would be a queen size, I had to purchase yards of fabric for the different motifs of fabrics that are required. The size of the quilt increased from 68x68 to 95x95. I had to figure out how many more squares and rectangles would be needed to make a queen size.


Eeks! I forgot that quilting a queen size quilt is a workout! The binding was quick and easy using my favorite method. 


In this photo, the quilting looks like it's taking away from the star pattern in the quilt, but I think it's the lighting. The quilting is much softer, but this does show the pattern of the quilting that I used for being able to quilt a queen size quilt with my sewing machine. 


The backside of the quilt is a solid print. I used 3 yards of 108" fabric. This was a fun quilt to make and would do it again, but not a queen size. I'm done making queen size quilts---and don't even think of a king!   


Friday, August 25, 2023

Cottage Garden

I love seeing a patch of densely blooming flowers. I also love cottage gardens. In my own garden, I have drought tolerant plants that form areas to create the look of a cottage garden. Each year I add new and different flowering drought tolerant plants in those areas to form a more densely cottage patch. 


This year, I have been inspired by my garden to make numerous quilts with flower motifs.


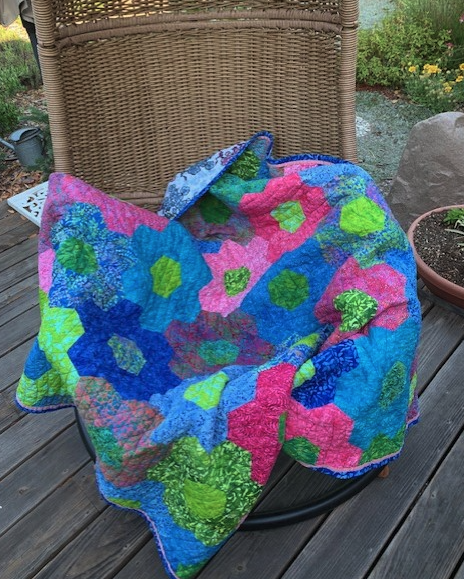
After seeing these beautiful batiks in a jelly roll, all I could think of was flowers and half-hexis.
Twice now I have arranged hexagons to make quilts with a flower theme. One quilt I did as a quilt-as-you-go and that quilt went to a friend in Japan. The other quilt I own and has a very wide border that is quilted with arcs.


After arranging the hexagons into flowers, I stitched them into rows and then the rows were stitched together. I opted out of doing this quilt as a quilt-as-you-go. Instead I basted the layers in prep for quilting.


I decided to go with arcs, but no borders. 


It took a week for me to quilt the arcs. The arcs represent the blowing of the wind through the flowers.


I opted for a blue binding with a pink flange instead of a border.  I'm into using flange bindings this year for most of my quilts.


The back of quilt is this pretty floral flannel. Come dead winter when I'm in need of "Spring" this quilt should keep me warm.


In my own garden, I have a rose that is a green flowering rose. The quilt has one green flower with a green center that represents my green rose in my cottage garden.


Saturday, July 15, 2023

Hawaiian Hanabi

This quilt for my daughter was inspired by her resent "I want-to-get-away" trip to Hawaii and her love of Japanese fireworks, Hanabi. 

While she was in Hawaii, I came across just by chance the Missouri Star Quilt Co's Youtube tutorial on the Burst Block quilt. It's a totally tiki look, Hawaiian vibe!


I ordered the Burst Block template, along with all the 10 square batiks and blacks that I needed to use for the blocks.


I picked out colors that gave me a Hawaiian feel of ocean, land, vegetation, and lava.


I had to watch the tutorial a couple of times to pick up important tips on placement of the template. The black 10 squares got cut as shown above and the colored batiks were cut in half as shown above. The black triangles and batik triangles are placed right and left side from center black cuts. 


After sewing the batik triangles to the black center, the ruler is placed first on right side with the single dot/line on the sewn seam and the template's small tip as close to the center black's tip while keeping the line on the seam. Cut on right side of template. The cut off triangle fabric is set to the right side to keep order for future placements and cuttings of right side block.


After right side is cut, flip ruler so writing is down, as in above photo. Again match up single dot/line with seam and small tip as far down as possible to center bottom, and then cut on left side of template. 


Single dot/line is goes with first seam, two dots/line with second seam, and three dots/line with third seam. It is important to make sure the small tip of template is as close to the bottom tip of the black center, which helps in keeping consistency of the bursts. When working on right side of block, the template is placed with words read correctly. And when working on left side of block the template get flipped so the writing is down. Also very important in making the blocks, one needs to keep the fabrics for right side of block on right and fabrics for left side of blocks on the left. 

Squaring up the block is done by cutting off the excess fabrics as shown above. Having a rotating mat was also helpful in cutting and squaring up blocks.


After all blocks were assembled, I then arranged the blocks for the effect of ocean, sand, land, and lava.


The back side is 108" width fabric that reminds me of fireworks. Since the back was all the one fabric and I used that same fabric for the binding, I added a white flange on the back side to give the back more bling and charm.