Showing posts with label mini quilts. Show all posts

Monday, December 19, 2022

It's Beginning To Look Like Christmas

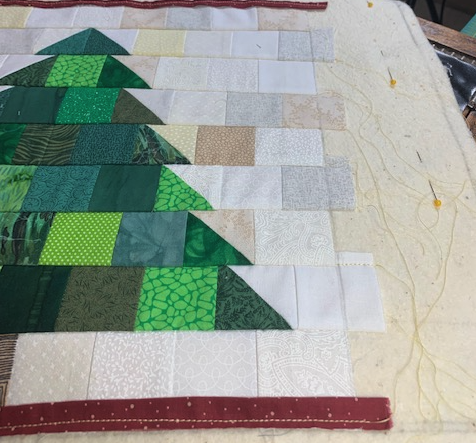
My daughter asked for a decorative Christmas Tree ornament similar to one my mother made for me decades ago. It's a 5 inch stuffed felt pine tree with bead work to represent ornaments on a Christmas tree. Instead, I'm surprising her with a different one, a quilted tree. 


I followed Jordan Fabric's Christmas tree pattern for assembling the tree and border. Blocks were sewn into rows. I then decided to make this project into a quilt-as-you-go.


The batting was set up for assembling the rows together by using the quilt-as-you-go method.


Once the rows were all sewn down, I then added a flange before adding the border. 


Buttons and beads are the final touch. The beads are from my mother's bead stash and the buttons I found. 


Thursday, June 16, 2022

Florida Star!


Many years ago, I followed a paper piecing stars project. I made about 10 stars. Most of those stars went into a couple of quilts, with one decorating my wall above my sewing machines. This was the last star that needed to be finished. I think of orange trees when I look at this star, Florida Star. It's going up on the wall with my other small quilt projects.

Monday, February 17, 2014

Interleave Quilts

While researching quilts, I came across Lorrie Cranor's blog post on her Tartan Tango: http://lorrie.cranor.org/blog/2013/05/24/tartan-tango/. I liked it so much that I wanted to make an Interleave quilt. Lucky for me, Lorrie had posted directions on how to make a mini Interleave quilt for her 1 day workshops: http://lorrie.cranor.org/blog/2014/01/19/how-to-make-an-interleave-quilt/. So, I got busy digging through fabrics to make one, which then turned into two mini quilts. The project can be assembled in a day. I'm not going to post directions. One can find them on Ms. Cranor's blog.

Test run #1: The Helix

This pattern is made with the helix template.
I started with pulling fabrics, printing directions, and making a template. I didn't change the scale of the template since I figured it would work for this mini project.


I made my own grid.


I followed the directions for marking and cutting the panels.


Then, I marked the left side with my soft graphite pencil so that I had my reference point, which is handy to have.


Since my Davis NVF doesn't have the perfect 1/4 inch walking foot, the strips no longer matched the grid. That didn't bother me.


Finished with first test run. My husband says it looks like two breast while my son says it looks like an hourglass.


Test Run #2: Hourglass

This pattern is made with the hourglass template.
I decided to use three different colors per strip instead of the two that are in the directions. So, I made a mistake on which piece I wanted cut. Trial and error on my part.


I wanted the orange panel to be sandwiched between the purples. I had to rip out the orange and add a new panel, and then re-cut on the purple.


I love treadling my Davis NVF!


Finished the Hourglass Sine Wave.


The two projects. An Interleave Mini Quilt would make a wonderful gift for a math or science teacher...or even that math geek.




Tuesday, May 7, 2013

A Mother's Day Gift

When I saw the Pick Violets free paper piece pattern by Amy Friend of During Quiet Time on her blog, I knew it would be my next project. I made a small change to the handle of the garden shovel since I didn't want to deal with the smaller pieces.


My mom loves wild flowers. She will sometimes stop on a side of a road to pick daisies, Queen Anne's Lacy, and other summertime flowers to make a beautiful bouquet. The daisies in this mini quilt remind me of some of those roadside fields that my mom frequents in the summer. This spring my mom has been replacing some old, leggy plants in her yard. That's a prodigious job for her since Mom is in her eighties. Instead of giving my mom flowers for Mother's Day, I'm going to give her this small table topper. It should last longer than a bouquet of flowers.

Thursday, December 8, 2011

Having Fun!

Took time out to explore free motion quilting with my Davis NVF. Normally I just used this machine for straight stitch quilting and attaching bindings. Today, I used it for making some potholders that will be Christmas presents. Since I'm not gifted in drawing (my sister and my kids inherited that gene, not me), I just outlined the pattern on some fabric that has large floral prints that my mom gave me. I found a good use for that stash of fabrics. The silver material is ironing board fabric.
The first potholder has the silver material on the back.
First potholder:


This became the bottom of the potholder with the printed side inside the finished potholder. The top layer, printed fabric and batting, was quilted with curvy lines. The potholder has top printed fabric, layer of batting, printed fabric from above section, layer of batting, and silver back.


The second potholder:
The ironing board fabric is sandwich inside with batting layers.


Since these are rather large potholders, they could be use as cloth trivets.

The binding was attached with the Davis NVF and finished with decorative stitching from the Singer 328K, Hank the Tank.

First potholder's binding was done with the method I came up with in my Time for Another Tute tutorial. On second potholder, I used the same method, but I just shifted the straight stitch line that I use to secure the binding down before stitching the decorative stitching. I like the look of the straight stitch line move in closer to center, since it now looks like it is part of the decorative stitching.

Tuesday, November 30, 2010

Scrappy Christmas table topper

A scrappy table topper made with leftovers scraps.

Sunday, November 28, 2010

Red Runner

Christmas table runner for a lucky family member.

The green fabric is the backside of the runner.

All the fabric but the poinsettia fabric came from my mom. This is a fun way of recycling fabric.

Sunday, November 14, 2010

Christmas table runner


One down two more to go!


A close up of the straight line quilting. I used green thread on top which is difficult to see here.


Sewing with Mr.Two Spools. Making a Christmas table runner for some lucky person.