This reversible sewing machine cover is a great way to use up scraps of fabrics and batting. Ties can be added or not; it's all up to the look that you want. These instructions are without ties since I like the look of just draping the cover over the vintage machine. I will also give instructions on how a couple of the Treadleon exchange 6 ½ “ blocks can be used as part of the decorative strip for one side of the cover.
Materials:
Large leftover fabrics from previous quilting projects; some about ½ yd. in size.
leftover batting size 22”x25”
exchange blocks 6 ½ “ x 6 ½ “
contrasting thread or variegated thread
buttons
Directions:
Start with well starch fabrics.
Step 1 ( side 1)
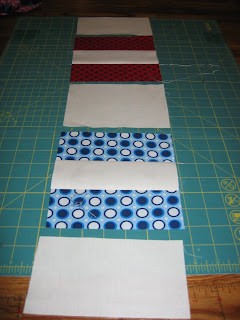
I'm using leftover muslin along with some exchange blocks that I made up for this decorative strip.
Cut muslin into 2- 6 ½ “ x 3 ½ “ block and 1- 6 ½ “ x 4 ½ “ block.
Sew a 3 ½ “ block to the bottom of each of the exchange blocks. Be careful of direction that the blocks will be positioned on the decorative strip. Have the writing on block in opposite directions. These blocks haven't been signed.
Sew a 4 ½ block to other ends of each exchange block. This will make up the center area of the decorative strip. Press.
Step 2 (side 1)
Cut 1- 3” x 23'' strip and 1- 11” x 23” strip ( these strips are about a ½ '” longer than the sewn decorative pieces). Sew strips to sides of decorative strip.
Press all fabrics.
Step 3
Cut out batting to size of finished side 1.
Pin into place or spray baste in place batting to wrong side of side 1.
Run a straight stitch in one or more of the ditches to hold batting to side 1. If you want to run more lines or any decorative lines then do so. And stitch around perimeter of side 1.
Step 4 (side 2)
For this side you are going to use some other fabric/s so that the motif on this side is different from side 1. You now have a choice of keeping it simple by just cutting a printed fabric the same size of the entire front, or making a more detailed side. I'm going to give directions for making this side with a solid color strip added to a print. You will need to decide what direction you want your decorative stitch to run. For this project I will have the strip run horizontal, and measurement below are for this direction.
Cut 1 13” x 19 ½ “ printed fabric
Cut 1 4” x 19 ½ “ horizontal strip solid color
Cut 1 7” x 19 ½ “ printed fabric
Sew printed fabrics to both sides of strip.
Press all fabrics.
Look at finished sides and how they are positioned.
Directions for border with binding:
Put side with batting on top of wrong side of side 2. Run as many stitches or decorative stitches to hold sides together. Cut strips for binding and sew together to form 2 ½ “ x 90" long strip. Fold strip in half, iron, and attach binding. You can finish of binding with decorative stitch. Decorate cover with buttons if you wish.
Side 1
Side 2
AND...
Directions for cover that doesn't have a binding.
Put right sides together of finished sides, then square up fabrics and pin.
Run a stitch around perimeter leaving a 3” opening for turning the piece inside out.
Turn inside out. Slip stitch opening close. Iron.
Run a straight-stitch down the length to hold side 1 to side 2 in either a ditch or somewhere for a decorative look. Add buttons.
Examples from my first cover done with this method.


No comments:
Post a Comment