Showing posts with label Davis NVF. Show all posts

Saturday, July 1, 2023

Wall Flower

 I saw the Wall Flower quilt on Missouri Star's Instagram post back in February and I immediately knew that I wanted to do this pattern as a quilt-as-you-go. I even liked the yellow and blue batik fabrics that they had used for that cute quilt.

So I ordered my mini peel, Heat & Bond Lite Sewable, Kona White Ten Squares, Floral Wave Batik Ten Squares, Batik backing fabric, and 5" x 15" ruler. The ruler made cutting the 10" squares down to 5" so much faster; I love this ruler. I just followed the Missouri Star tutorial on Youtube for the pattern and easy instructions.


I used yellow thread for the yellow based batiks and blue thread for the blue based batiks to stitch around the petals. 


I quilted each block individually since I was doing a quilt-as-you-go. I had gotten half way through quilting the blocks when I realized I wanted to make the Prairie Flower quilt for my son. (Yes, I watch a lot of Missouri Star Youtube.) So, this project was set aside for three weeks while I worked on my son's birthday quilt. 


Second week in June I finished all the quilting, arranged my quilted squares, and stitched them together.


One inch sashing was used to cover the seams on the backside of quilt. Since I didn't want any additional stitching/quilting lines to show on the front side, I hand stitched all of the sashing strips down. Hand stitching is not one of my favorite things to do, but for this project it was a must do.
 

 I finished the quilt with the flange binding method that I'm enjoying to use on my quilts this year.




Friday, February 17, 2023

Dreaming of Candy Hearts

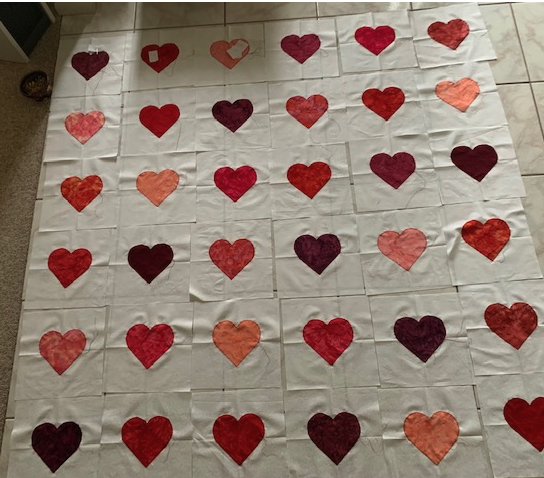
February, I think of candy hearts. For years, I have wanted to make a quilt with hearts for the month of February. 

This year, I made it happen.


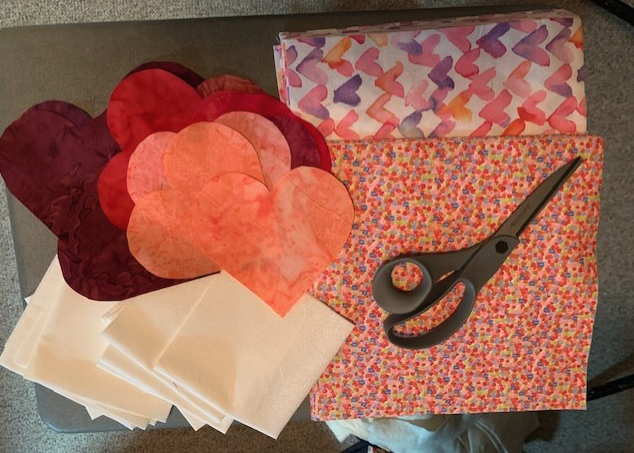
I started at the beginning of the month by cutting out my hearts from 5 inch batik squares that I got from Missouri Quilt Co in mid January. At first, I wanted to use a printed pattern with vintage, Valentine motif that Missouri Quilt Co was selling, but I was too late on that deal. The remaining fabrics came from Joann Fabrics since there was an awesome sale on fabrics. I cut 10 inch squares for front and back fabrics. 

This quilt is another quilt-as-you-go quilt since I wanted to use up remnant batting and also make it easier quilting. Much easier to quilt a 10" block with curves through the machine than maneuver an entire quilt.


So, I got busy zigzagging batting pieces to together for the 10 squares to be quilted.


Next, came centering the hearts and machine stitching the hearts down onto the tops, white 10" squares.


Hearts were arranged, numbered (36), and placed with back squares that also had been arranged. 


Squares were then sandwiched (top, batting, back) and quilted with my Davis Feed walking foot machine. I love that machine! 


Threads were knotted and then sewn under, between top fabric and batting. 


Stashing strips were cut, top 2" (little red hearts) and bottom 1.5" (white). I assembled the blocks with the back stashing first. I tried something different for the assembling of the quilt-as-you-go blocks on this quilt. 


After a row was formed, I then stitched down the top stashings. 


I decided to bind the quilt with the flange binding technique of stitching in the ditch. 


Most of the binding is purple with a little corner of red. The flange portion is mainly pink with just a little bit of orange.

My mom loved the "red hots", cinnamon red hearts. She would buy them every Valentine's Day instead of the candy hearts with the little messages. This quilt has both, minus the messages--those are for one to dream about.


Sunday, October 22, 2017

Scottie Dogs and Scraps

Finally finished the scrappy quilt yesterday! Since I was dragging from getting the flu shot the day before, I didn't feel like doing much over the weekend. So, I finished off the quilted quilt that had been sitting for weeks on the sewing machine waiting for the scrappy binding to be sewn onto it.


The back of the quilt has a Scottie dog and newspaper theme. I made sure all those cute Scottie dogs were well taken care of with the center square being a fabric with newspaper motif.


After completing the quilt, I then curled up in the warmth of the quilt and watched my favorite you-tubers for the rest of the day.

Monday, January 16, 2017

First Finish 2017

Yeah! First quilt of the new year completed!! This scrappy quilt has only taken me six months to get it finished. It's been over a year since I did any quilting with my Davis. Sitting down to quilt with this vintage beauty was like having tea with an old friend that I hadn't seen for awhile. She had waited patiently for me. She treadled so smoothly--it was like we had worked together just yesterday.


Then came stitching down the binding with a decorative stitch from Singer. She also performed effortlessly.


I had put a yellow flange on the backside of the quilt to dress the back up and bring out the yellows in the Chickadees.


My father loved watching and feeding wild birds, and his favorites were the Cardinals and Chickadees. My mom loves Bittersweet, and the berries in the design looks like American Bittersweet. So when I saw this fabric, I knew I must have it to use in one of my quilts.


The bird fabric could have been used as large blocks to give the back of the quilt a more pieced, pattern look, but I just wanted to get the quilt done.


Many of the scrapes came from my mom, but there are many that came from me. I plan to make this year the year of scrappy quilts since I have a large stash of fabrics.


Tuesday, June 30, 2015

Thinking Pears But Seeing Avocados

My Mother's birthday is coming up, and I want give her a new table runner for her dining room table. She always has the table beautifully decorated with a runner and flowers. 


When I had seen this pattern at AlamosaQuilter a year or so ago, I knew that I would make it for my Mom. I had a screen shot of the pattern sitting on my computer for such a long time, and I would remind myself that one day I would get around to producing my own runner whenever I took a glimpse of the photo.


Since I enjoy machine stitching over hand stitching, I stitched the edges down with a decorative stitch using the Singer Treadle 224.


I decided that I wanted to make this into a circular top. So, I looked around the house for the largest circle that could be use to trace a circle onto the fabric. Yup, that worked!


After pinning the layers together, I started straight stitch quilting using my Davis Vertical Feed. It had been awhile since I had used the Vertical Feed. Oh, how I had missed quilting with this beauty. The machine hummed and I was at peace. This was a fun project! My son asked if the fruit were avocados or pears. I had thought pears, but now I'm seeing avocados. 


Sunday, March 23, 2014

Grandmother Flower Garden Half-Hexis

A numerous years back I made a quilt using half-hexis and the grandmother flower garden pattern using Bali-pops. Since I enjoyed that project, I decided to make another one using the quilt-as-you-go method to attach the rows. After selecting and grouping the Bali-pop strips, I cut them into half-hexis.


The half-hexis were arranged into flowers for the front, and leftover half-hexis were incorporated onto the back. I used my Singer 224 to attach the half-hexis to the back fabric with a decorative stitch.


For the front of the quilt, I pieced the half-hexis together into rows.


Next, I hand-basted the sandwich of muslin, batting, and back of quilt together. After drawing my starting line onto the muslin, I placed my first two rows down on the line and stitched them into place.


From there, I continued to add rows using my Davis NVF.


I decided to use the quilt-as-you-go method for quilting since there would be no quilting lines to distract from the simplicity of the flower garden motif.


Monday, February 17, 2014

Interleave Quilts

While researching quilts, I came across Lorrie Cranor's blog post on her Tartan Tango: http://lorrie.cranor.org/blog/2013/05/24/tartan-tango/. I liked it so much that I wanted to make an Interleave quilt. Lucky for me, Lorrie had posted directions on how to make a mini Interleave quilt for her 1 day workshops: http://lorrie.cranor.org/blog/2014/01/19/how-to-make-an-interleave-quilt/. So, I got busy digging through fabrics to make one, which then turned into two mini quilts. The project can be assembled in a day. I'm not going to post directions. One can find them on Ms. Cranor's blog.

Test run #1: The Helix

This pattern is made with the helix template.
I started with pulling fabrics, printing directions, and making a template. I didn't change the scale of the template since I figured it would work for this mini project.


I made my own grid.


I followed the directions for marking and cutting the panels.


Then, I marked the left side with my soft graphite pencil so that I had my reference point, which is handy to have.


Since my Davis NVF doesn't have the perfect 1/4 inch walking foot, the strips no longer matched the grid. That didn't bother me.


Finished with first test run. My husband says it looks like two breast while my son says it looks like an hourglass.


Test Run #2: Hourglass

This pattern is made with the hourglass template.
I decided to use three different colors per strip instead of the two that are in the directions. So, I made a mistake on which piece I wanted cut. Trial and error on my part.


I wanted the orange panel to be sandwiched between the purples. I had to rip out the orange and add a new panel, and then re-cut on the purple.


I love treadling my Davis NVF!


Finished the Hourglass Sine Wave.


The two projects. An Interleave Mini Quilt would make a wonderful gift for a math or science teacher...or even that math geek.


Monday, February 3, 2014

Jeans and More Jeans

A TreadleOn friend had given me four large boxes of used jeans that she never got around to using. Since I have made numerous denim quilts with that stash, I decided to thank her with a denim quilt. I had picked out the cute bandana fabric some time ago thinking that it would look great as a backing fabric for a denim quilt. The solid reds are the strip fabrics used between denim squares, and the red with pattern fabric is the binding fabric.


This quilt was made using what I'm now calling the Mondrian Denim pattern. I just quilted this one different from the others that I have made.


After all the pieces were arranged and stitched into sections easy enough to handle in quilting, I pinned the back fabric on and then used tape to mark my lines. There is no batting in this quilt.


I like using this tape method, but it was a bit tricky when lining up the lines with the next section to quilt. I left all of the tape on the first section to line up the lines on the next section.


I left a gap of a half-inch (green section of the cutting mat) for the space of red strip and used the ruler to line up the lines. My quilt lines are close to a 1/4 inch from the tape.


Then I slowly transferred the tape and quilted. I did this for all of the sections.


I thought this method would save me some time, but in the end I don't think it was any faster than when I quilted inside each square like I did on the last Mondrian quilt that I made.


This will be my last denim quilt project for awhile since it's time to try other designs and projects that are on my ever growing to do list.